DIY HELLO KITTY PIÑATA TUTORIAL 🐱❤️ This is my thi DIY HELLO KITTY PIÑATA TUTORIAL 🐱❤️ This is my third year making a piñata for big sis’ party so it’s become an annual tradition! Even the kids at the party asked me if there will be a pinata this year lol. We love seeing the kids get better and stronger with their swings as they get older 🥹 

This pinata cost me less than $5 to make but it does take a lot of time and patience. It turned out so cute tho! Comment SHOP and I’ll send links to all of the pinata making supplies + written instructions #pinata #diyparty #hellokittyparty
BÁNH MÌ BAR! 🥖❤️ My mom makes us these simple bánh BÁNH MÌ BAR! 🥖❤️ My mom makes us these simple bánh mìs all the time, so we thought it would be fun to turn it into a mini bánh mì bar for big sis’ birthday party!

My mom made the pâté and pickled carrots + daikon (đồ chua), and for the meat, we just bought Vietnamese ham (chả lụa). We set out all the toppings - cilantro, cucumber, and jalapeno - so everyone could build their own.

These cutie, perfectly sized baguettes are from Q Bakery. My dad went super early to grab them because they sell out fast!

Big sis also requested Panda Express catering since it’s one of her favorites! Comment SHOP for links! #banhmi #foodbar #foodstation
Here is everything we did to prep for big sis’ 6th Here is everything we did to prep for big sis’ 6th Hello Kitty strawberry themed birthday party! 🍓🐱🎀❤️ This one was so fun to put together because I loved Hello Kitty growing up! 

Huge thanks to @ws_kidsparty for the adorable market backdrop, cart, kids chairs, and the fun kids program that everyone loved! ❤️

Comment SHOP for links to everything! #kidspartydecor #partysetup #hellokittyparty
Jeff’s office just got a new upgrade! 🤩 I got him Jeff’s office just got a new upgrade! 🤩 I got him the new @tcl_usa F8D Fire TV cause a guy cant have too many screens 😂 This TV uses QLED technology and has 4K Ultra HD resolution and is available exclusively on Amazon. Comment SHOP for a link to everything! #tclpartner
Did you know you can just…trace onto canvases?! 🎨 Did you know you can just…trace onto canvases?! 🎨 I was soo close to spending $8 per character canvas on Etsy until I learned that I could transfer printed designs onto blank canvases myself!

Between me and Jeff, we traced 30 Hello Kitty canvases in under two hours while watching Married at First Sight Seattle 😂 It was actually kinda fun and saved us $200!

Comment SHOP and I’ll send you the transfer paper and canvases I used + easy DIY instructions ❤️ #canvaspaintings #kidspartyideas #kidscraft
Had to share one last recap of my parents’ 50th we Had to share one last recap of my parents’ 50th wedding anniversary party because that clip of them dancing and my dad dancing with my daughters will forever be one of my favorite memories 🥹

My parents fled Vietnam in 1975 after the war ended. When they arrived in Washington to meet their sponsors, my dad happened to see my mom and aunt at the airport struggling and not knowing any English. He stepped in to help them then pursued my mom for the next six months. They got married shortly after in 1976 and the rest is history!

As recent refugees starting over in a new country, they didn’t have much money, so they had a small, simple wedding. That’s why I knew I wanted to make their 50th anniversary party extra special and give them the beautiful celebration they never had. Happy 50th anniversary to my parents!! ❤️🥂 #50years #anniversaryparty
DIY MARQUEE SIGN! 💡 This is my second time buying DIY MARQUEE SIGN! 💡 This is my second time buying this kit and it’s so easy to make this marquee sign, just snap and hot glue! You can choose any number or letter for your party. This is the 3-foot option. Comment SHOP for the link! #amazonfind #marqueenumbers
AMAZON HOSTING HACK 🤍 To get the draped table look AMAZON HOSTING HACK 🤍 To get the draped table look, use these backdrop curtain drapes! I’ve already washed them and they came out looking clean and new still. Excited to use them for an actual backdrop too. Comment SHOP for the exact link! #hostinghack #tablesettingideas
My favorite part of decorating for a party is putt My favorite part of decorating for a party is putting together the table setting! This one turned out so elegant and timeless 🤩🤍 I’ll share what I used for the draped, pleated look in another video. Comment SHOP for all the links to my parents’ wedding anniversary party decor! #tablesetup #anniversaryparty #tablesettingideas
  • About
  • TikTok
  • My Amazon Page
  • My LTK
  • Lifestyle
    • Beauty + Hair
    • Career + Finance
    • Culture
    • Food + Recipes
    • Travel
    • Wedding
    • All
  • Home
    • DIY
    • Entertain / Parties
    • Home Decor
    • Organization + Cleaning
    • All
  • Motherhood
    • Maternity Outfits
    • Pregnancy + Postpartum
    • Baby 0-12 months
    • Toddler
    • All
  • Fashion
    • Fall / Winter Oufits
    • Spring / Summer Outfits
    • Maternity Outfits
    • All
  • Shop + Links
    • My Instagram / TikTok
    • My Amazon Page
    • My Home
    • My Favorite Retailers
  • Contact
    • About
    • Contact Me
    • FAQ

Just A Tina Bit

A Seattle Lifestyle Blog

  • Lifestyle
    • Beauty + Hair
    • Career + Finance
    • Culture
    • Food + Recipes
    • Travel
    • Wedding
    • All
  • Home
    • DIY
    • Entertain / Parties
    • Home Decor
    • Organization + Cleaning
    • All
  • Motherhood
    • Maternity Outfits
    • Pregnancy + Postpartum
    • Baby 0-12 months
    • Toddler
    • All
  • Fashion
    • Fall / Winter Oufits
    • Spring / Summer Outfits
    • Maternity Outfits
    • All
  • Shop + Links
    • My Instagram / TikTok
    • My Amazon Page
    • My Home
    • My Favorite Retailers
  • Contact
    • About
    • Contact Me
    • FAQ

DIY, Home, Lifestyle, Wedding · May 6, 2020

DIY Wedding Donut Wall

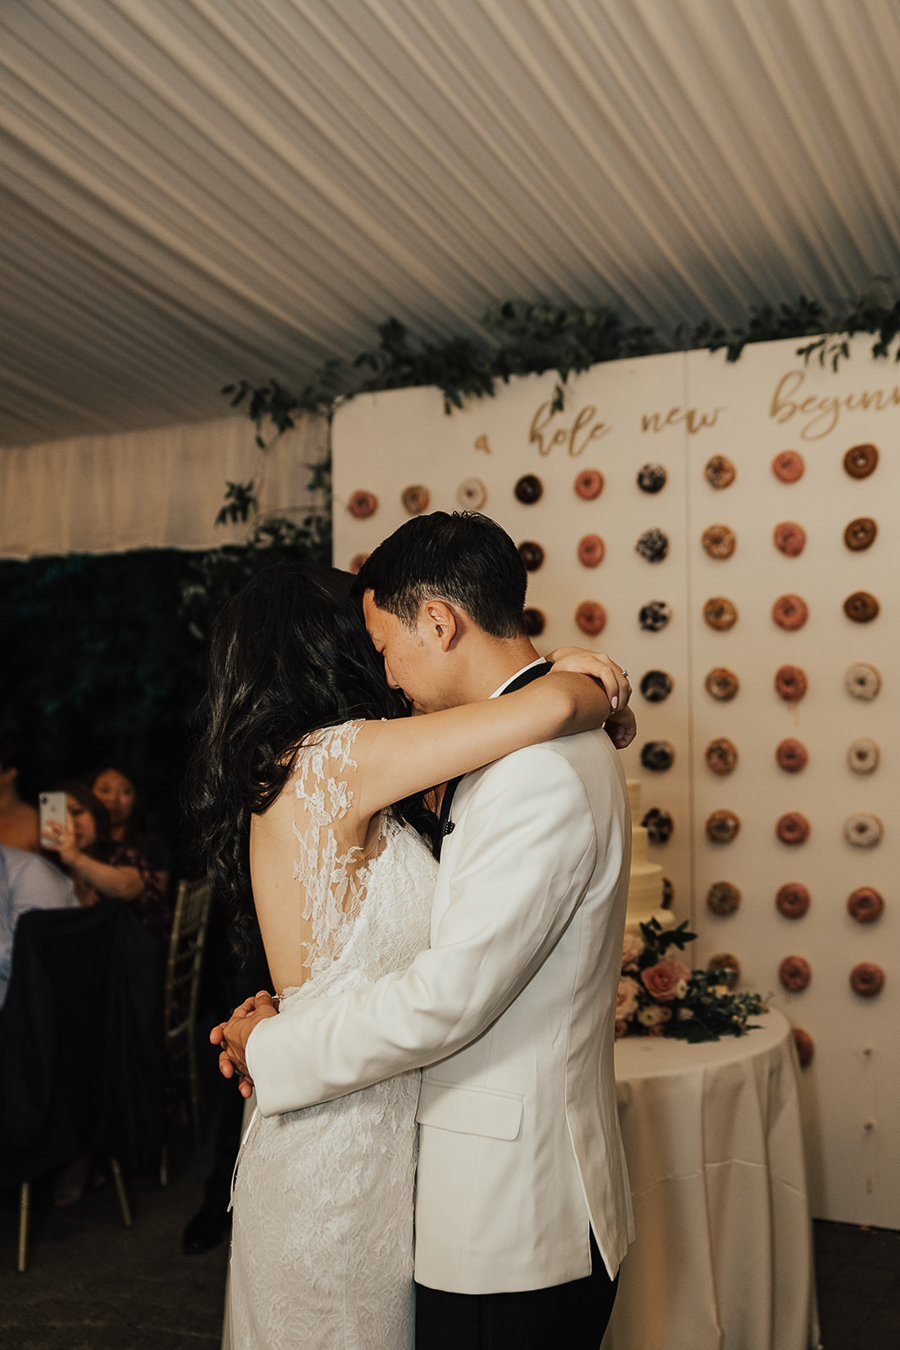
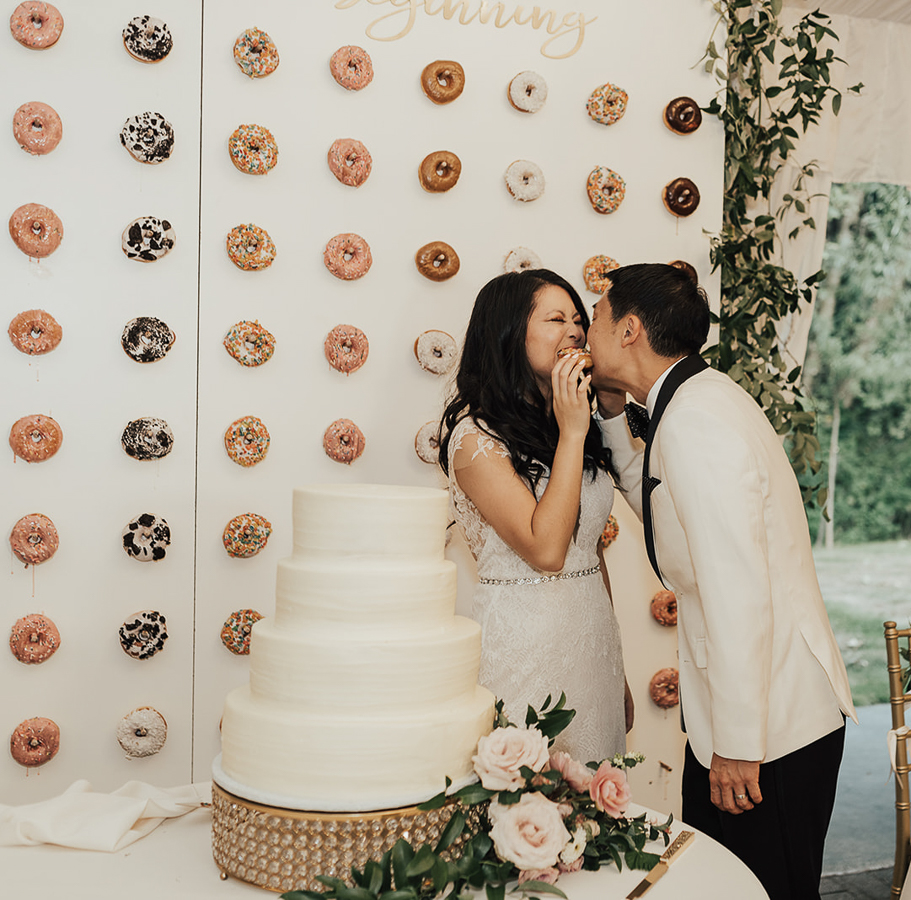
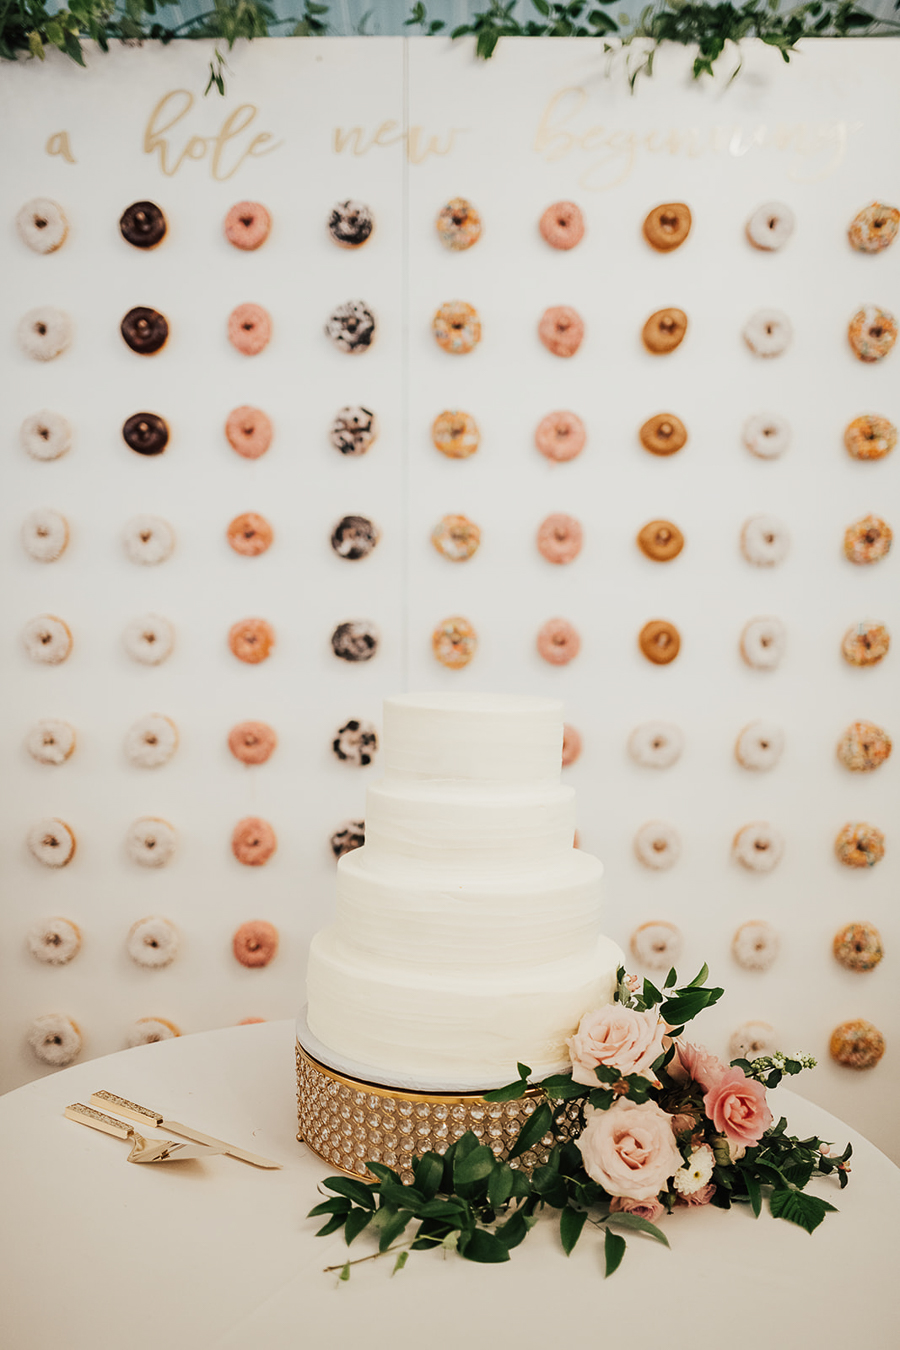
Today is our two year engagement anniversary so I thought it would be fun to reminisce something from our wedding day! One thing that we really wanted was a GIANT wedding donut wall. Throughout our relationship, Jeff and I loved getting donuts at least once a week so we wanted to share our love for donuts with our guests too!

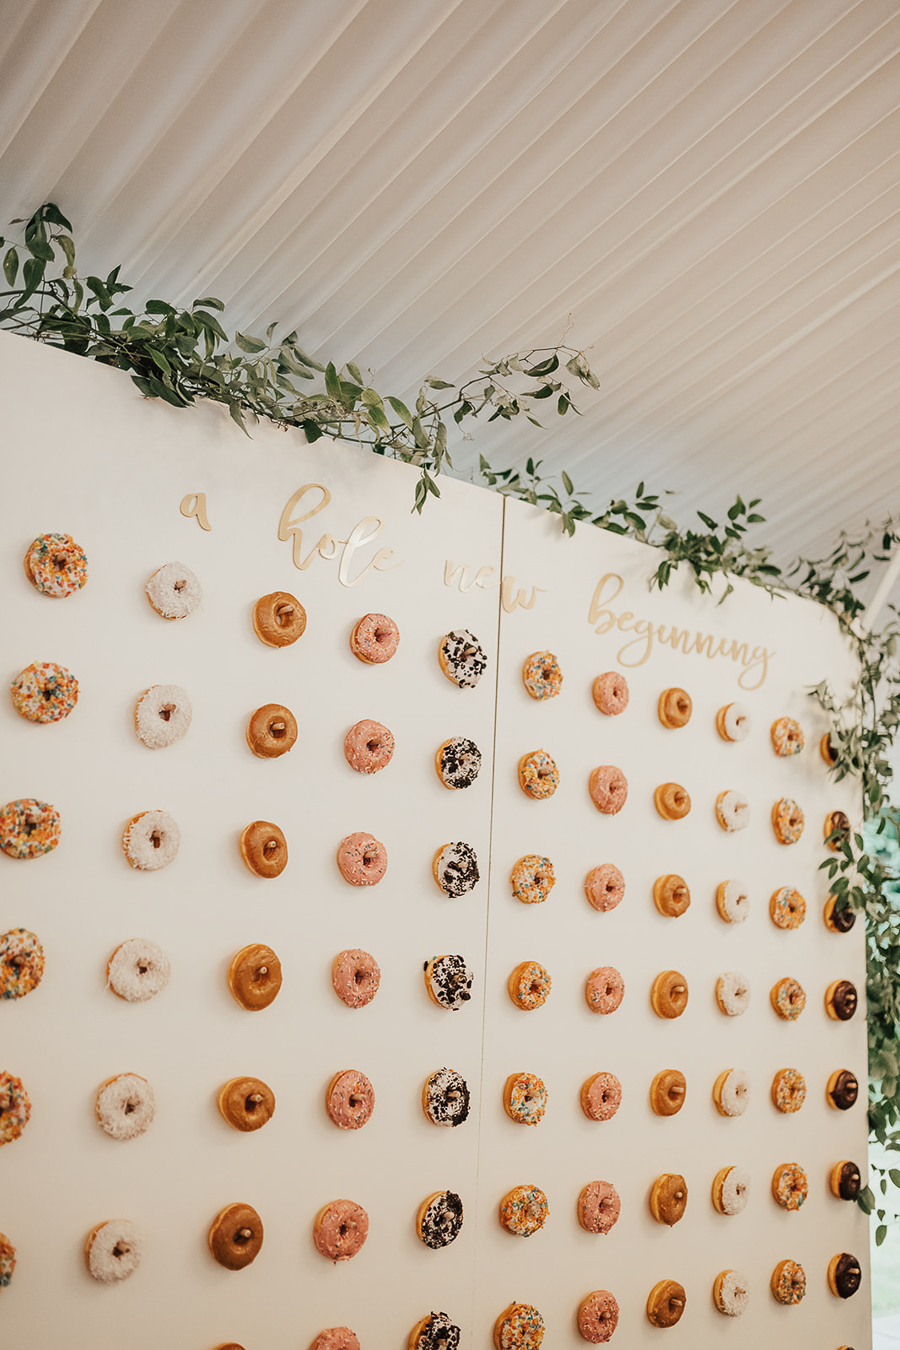
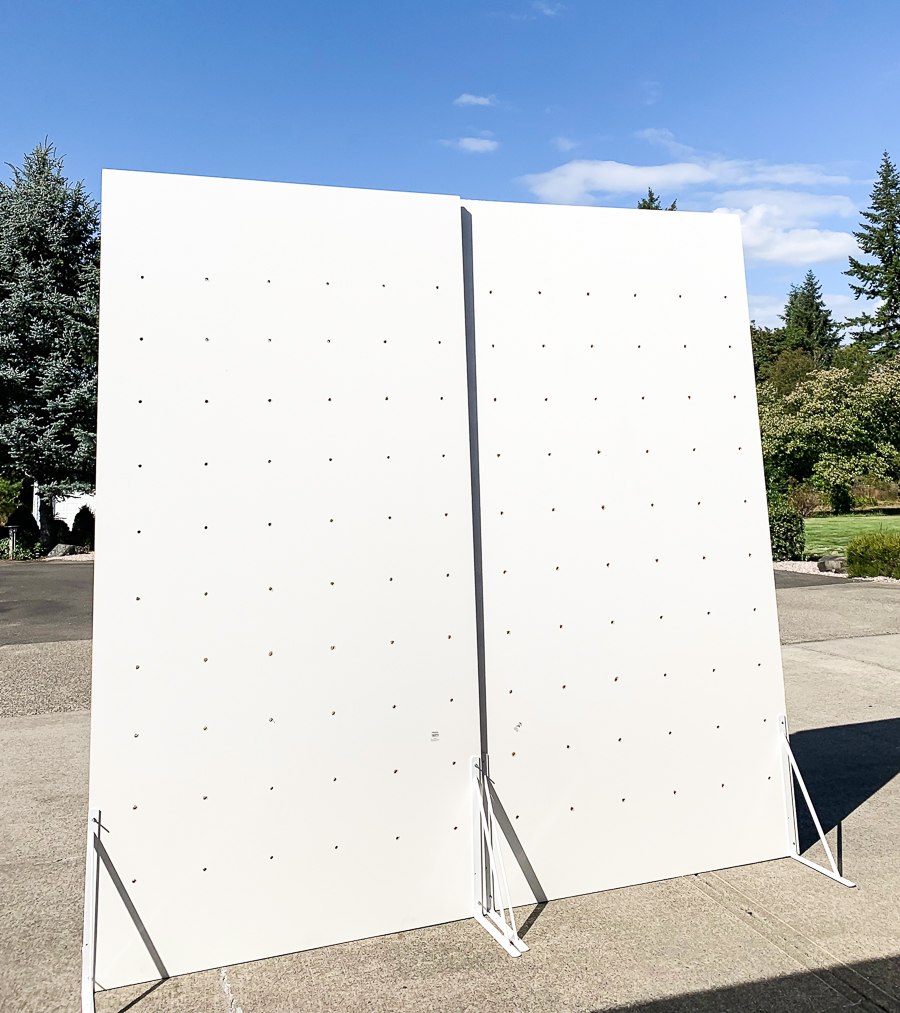
This DIY wedding donut wall was made by my little brother, Daniel, who has never done this before. But wow, did it turn out INCREDIBLE and everything I wanted! I just sent him a few ideas from Pinterest and he totally exceeded my expectations! This huge DIY wedding donut wall was 8’x8′ and definitely one of the highlights on our big day! It was also extra special to me since Daniel got hurt during the process. He accidentally deeply cut his finger while putting it together and had to leave during the reception to get stitches (he didn’t even tell me about it until later that night!). I am so grateful for everything he did for us and will never ever forget this amazing donut wall he built! Here are the instructions on how to recreate this DIY wedding donut wall!
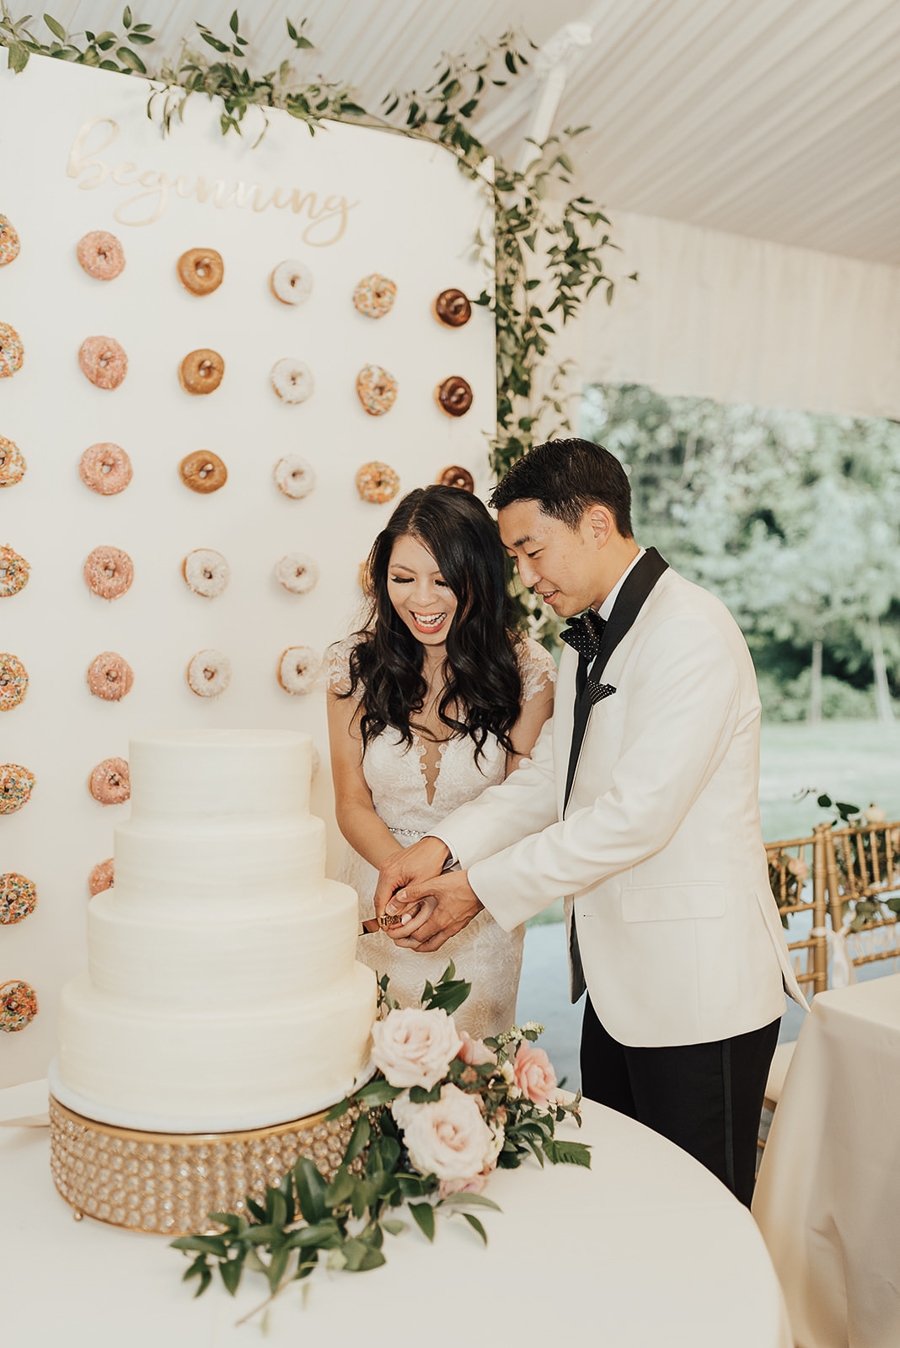
DIY donut wall, wedding donut wall, DIY project, Seattle garden wedding, how to make a donut wall, extra large donut wall, donut wall decor, a hole new beginning wedding donut pun, cake cutting donut wall backdrop, Seattle blogger Just A Tina Bit wedding

What You’ll need:

  • 2 sheets of white melamine (4ft x 8ft)
  • 1 smaller sheet of white melamine or any kind of wood (4ft x 4ft)
  • 120 dowels (10mm x 74mm)
  • 4-6 clamps
  • Drill
  • 10mm drill bit
  • 8 right angle brackets
  • 2-3 continuous hinge

DIY Wedding Donut Wall Instructions

Step 1: Determine measurements

Measure the diameter and hole size of your donuts to determine 1) how much space you need between each donut and 2) the dowel size, length, and spacing between each. We ordered our donuts from Donut Factory so we bought a few to test out the measurements, and of course, devoured them afterwards! Based on the size of our donuts, we decided on 4 inches between each donut and used dowels that are 10mm (diameter) x 74mm (length). Don’t forget to sketch this DIY wedding donut wall out to better visualize it before you begin!

Step 2: Create a template

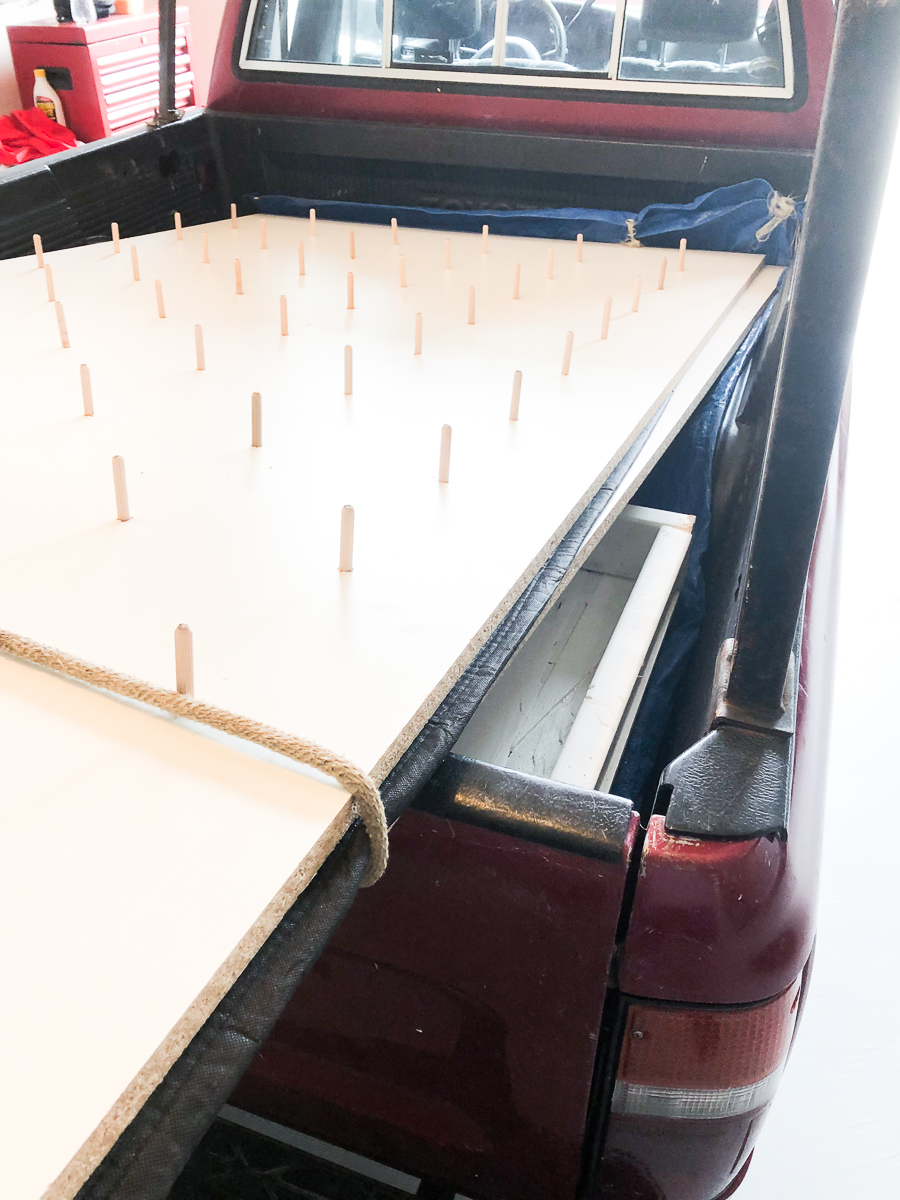
Once you have the proper spacing determined, take the 4×4′ melamine sheet to create your donut wall template. This template will help you ensure the drill holes on the final donut wall are symmetrical as well as to speed up the drilling process.

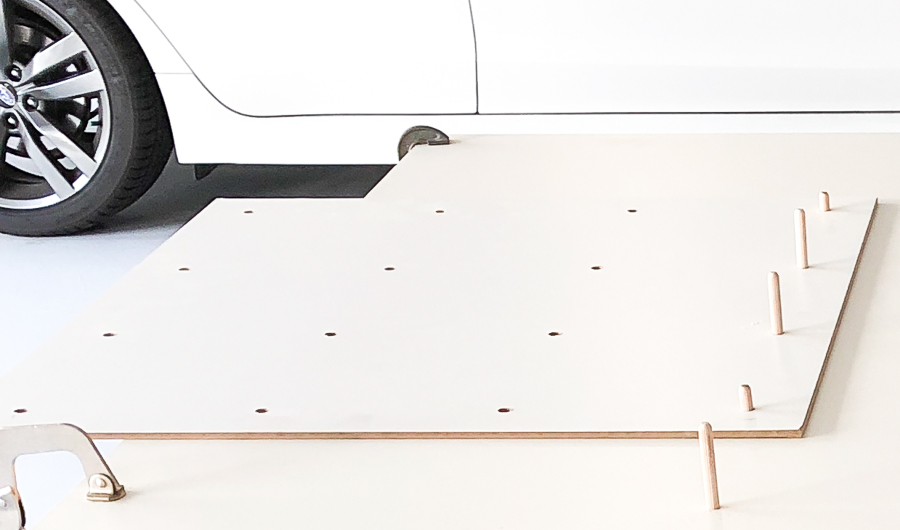
Drill into the template sheet based on the donut measurements you determined in Step 1. Daniel created a 4’x4′ template with 16 holes total as shown below. Pro Tip: Start by testing out a drill hole that’s slightly smaller than the diameter of the dowel to ensure the dowel will be secured. This will help ensure the drill holes are tight enough to hold the dowels and you won’t have to use any glue. In my brother’s case, he tried a 9mm drill bit first and worked his way up to the 10mm drill bit, which was perfect for the 10mm dowel.
DIY donut wall, wedding donut wall, DIY project, how to make a donut wall, extra large donut wall, Seattle blogger Just A Tina Bit wedding

Step 3: Clamp together melamine sheets

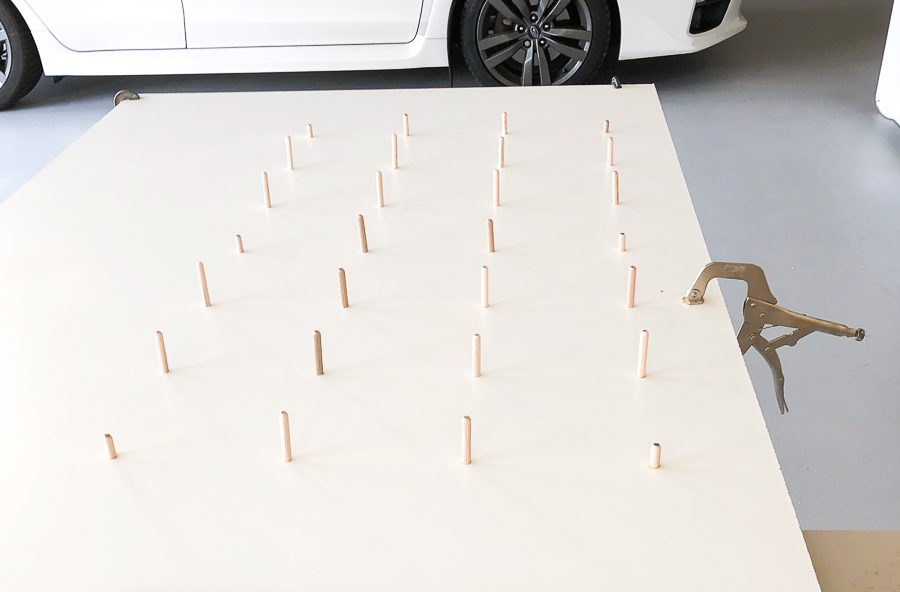
Grab a table or something to elevate the two 4’x8′ white melamine sheets. Place the two sheets on top of each other and ensure they are perfectly aligned. Use 4 to 6 clamps to tightly secure the sheets together. This is so that you can drill into both sheets simultaneously, which will save time and effort compared to drilling through each one separately.
DIY donut wall, wedding donut wall, DIY project, how to make a donut wall, extra large donut wall, Seattle blogger Just A Tina Bit wedding

Step 4: Use template to drill dowel holes into donut wall

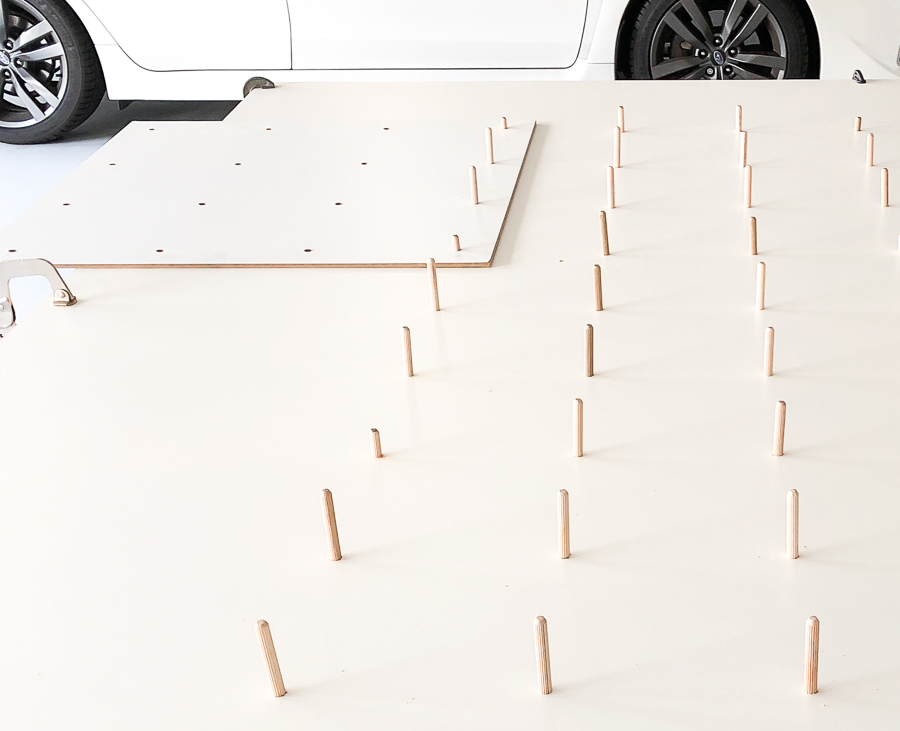
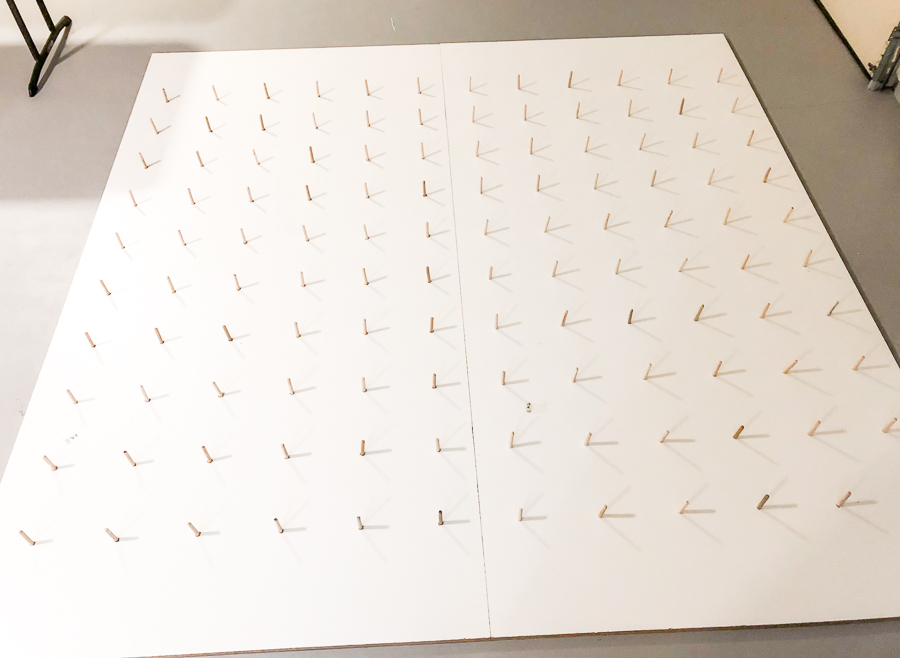
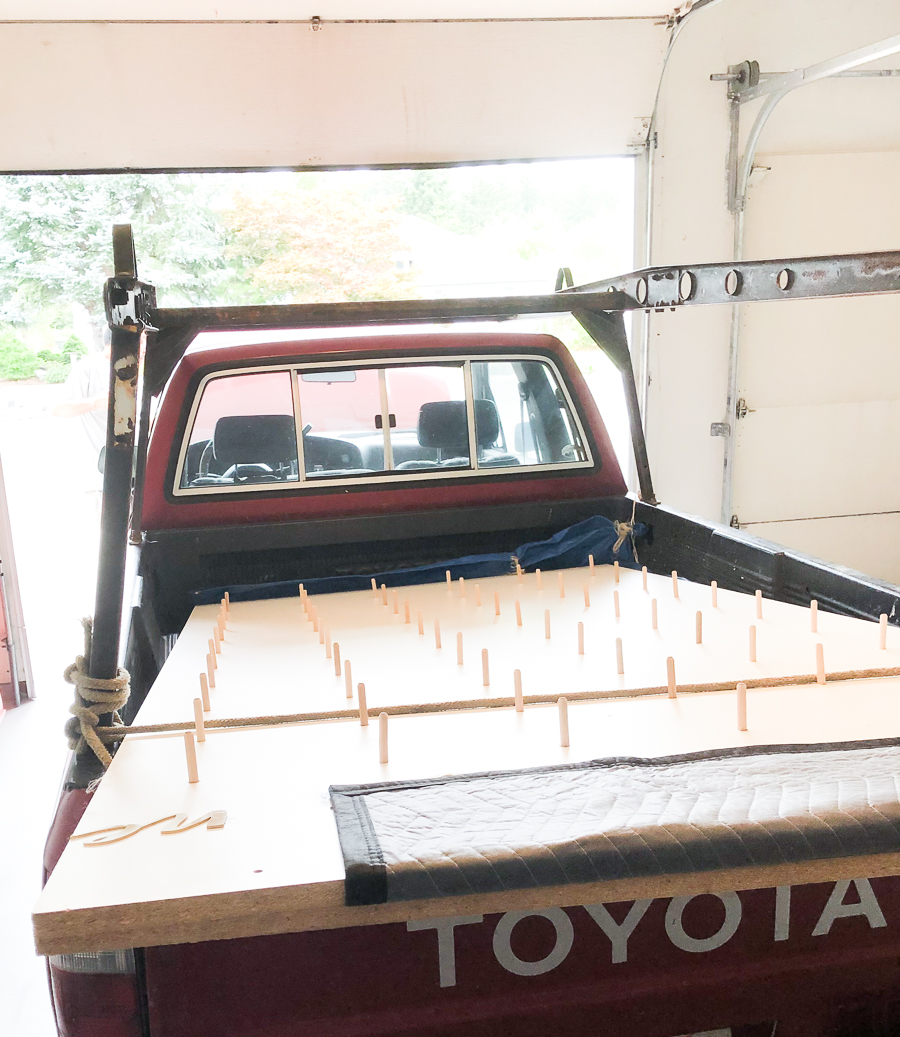
Take the donut wall template and line it up to where you want the dowel holes to be on the clamped melamine sheets. Line the template against the edge of the sheets for better accuracy. Drill into the first corner hole of the template all the way through both sheets. Insert and leave a dowel in each hole to ensure it fits accordingly as well as to keep the template secure. For the next 3 holes, drill the remaining corners of the template and insert the dowels so you have an even amount of force to hold the template in place. Lastly, drill the remaining holes from the template. Remove the template and insert the dowels into each hole, ensuring they fit tightly.

When moving onto the next section, place the template to overlap one row from the last section to ensure the spacing stays the same. So instead of drilling 16 holes from the template, you may only do 12. Repeat this entire template and drilling process until you’ve completed the whole wedding donut wall.
DIY donut wall, wedding donut wall, DIY project, how to make a donut wall, extra large donut wall, Seattle blogger Just A Tina Bit wedding

Step 5: Vertically secure donut wall

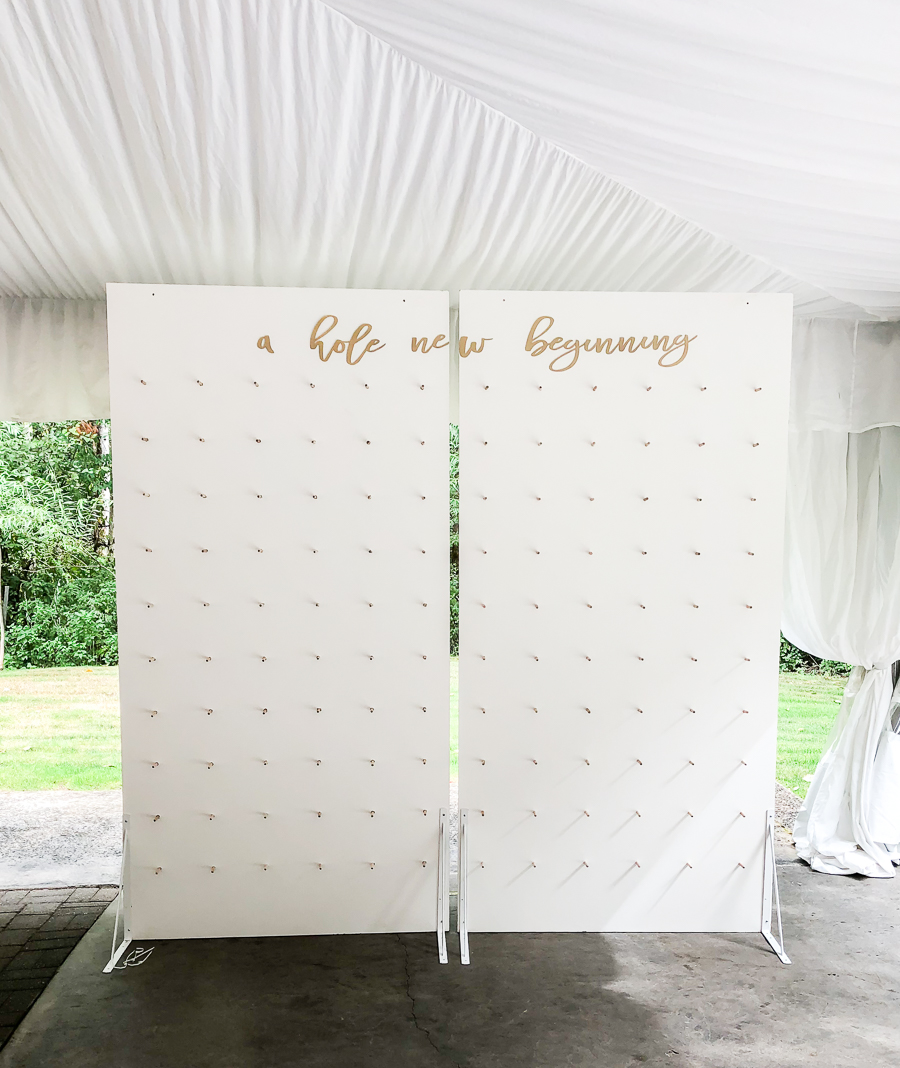
To stand up each of the 4’x8′ melamine sheets, install 4 right angle brackets at the bottom corners, 2 in the front and 2 in the back. This ensures the donut wall won’t tip over.

Then install 2 to 3 continuous hinges straight up and down in between the two donut walls to pull them together to make one giant wedding donut wall. Note that this step was not completed until the day of the wedding since we needed to keep them separate to transport them in my dad’s truck. However, Daniel did install the words “A Hole New Beginning” prior to wedding day to save time.
DIY donut wall, wedding donut wall, DIY project, how to make a donut wall, extra large donut wall, Seattle blogger Just A Tina Bit wedding

Step 6: Decorate wedding donut wall

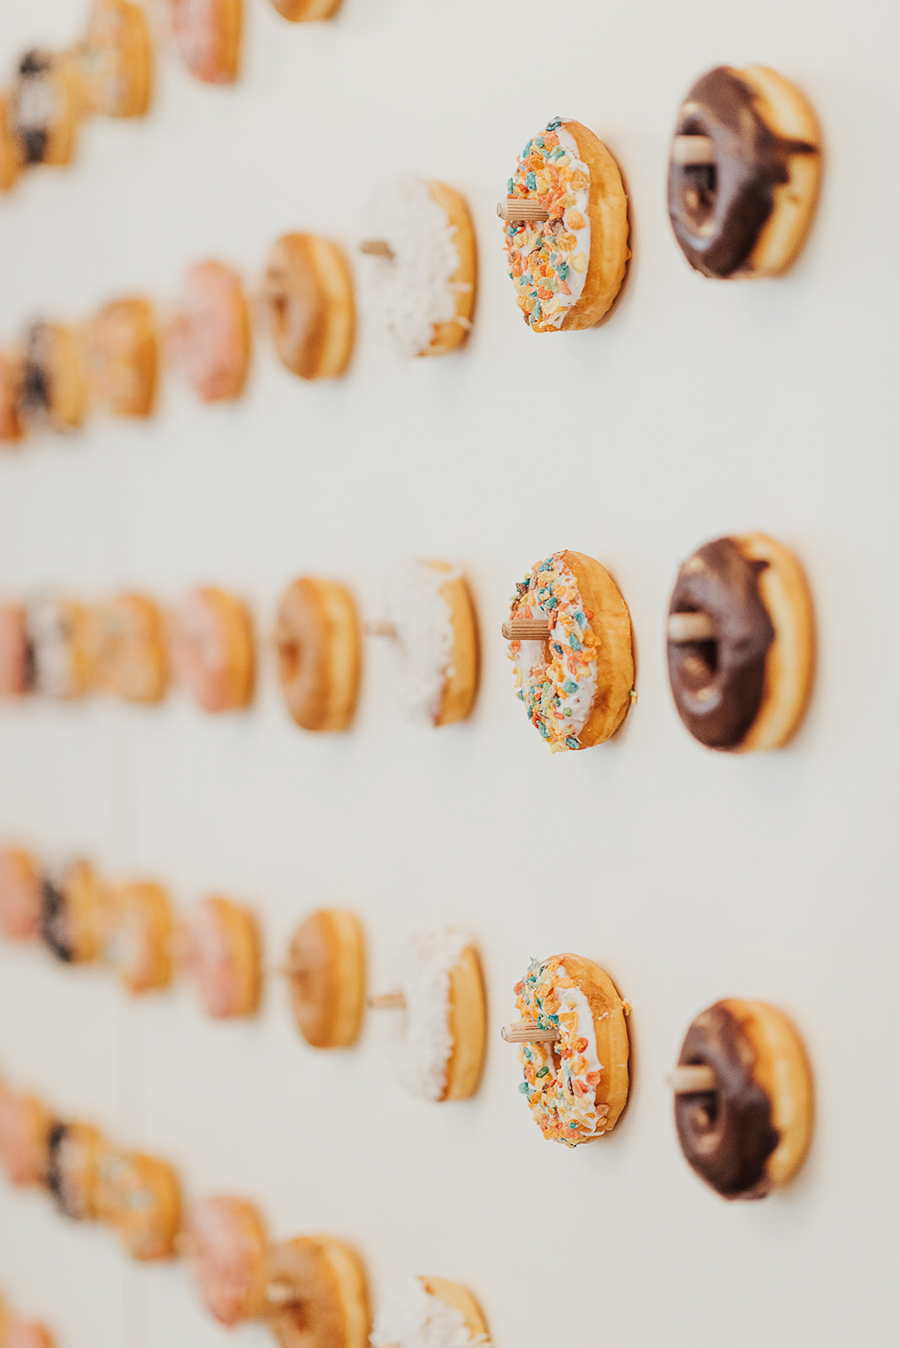
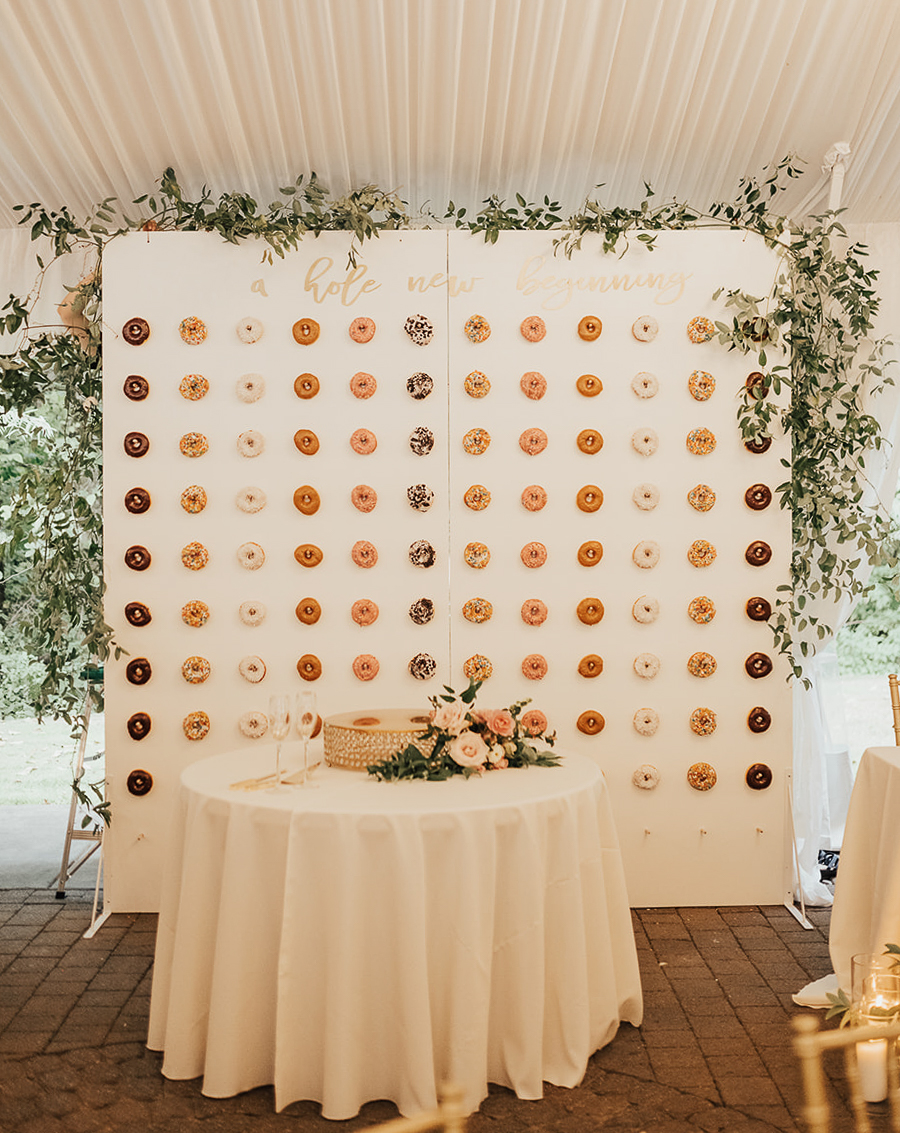
Once Daniel secured the two melamine sheets to make one gigantic donut wall at the wedding venue, my family and friends helped put up the donuts from the Donut Factory onto the dowels. We had 6 different yummy raised donut flavors: Vanilla Coconut, Vanilla Oreos, Fruity Pebbles, Strawberry Sprinkle, Maple, and Chocolate. My florist, Stephanie Roseanne Design, put on the final touches of the smilax greenery at the top of our DIY wedding donut wall. Doesn’t it all look beautiful and awesome?! I am still completely blown away that my brother built this and made all of my wedding donut wall dreams come true!

All wedding photos by Sam and Sola Lee Studio
Share this:

  • Click to share on Twitter (Opens in new window)
  • Click to share on Facebook (Opens in new window)

In: DIY, Home, Lifestyle, Wedding

don’t miss a post

You’ll Also Love

Scary, House Tour, Halloween Home Decor, Spooky Season, Scary Decor, Pumpkins, Skeletons, Candy, Decor, Kitchen Halloween Decor, Spiders, WebsHalloween Decor House Tour
TREE is located in Bellevue and Tacoma, Washington, offering eco friendly and sustainable home decor and home furnishings, made of reclaimed and recycled materials5 Eco Friendly Home Decor Items You Need from TREE
DIY Toy Story Family Costumes

Comments

  1. Lisa Autumn says

    May 7, 2020 at 2:58 am

    OMG this is such a great idea I love this!

    Lisa | lisaautumn.com

    Reply
  2. Jennifer says

    May 7, 2020 at 4:08 am

    This is such a cute idea!

    Jennifer
    Effortlessly Sophisticated

    Reply
  3. Carrie @ Curly Crafty Mom says

    May 8, 2020 at 3:52 am

    This is so, so cool! I’ve never seen anything like this! It makes a cool backdrop!

    Carrie
    curlycraftymom.com

    Reply
  4. Kathrine Eldridge says

    May 8, 2020 at 4:44 am

    I would of killed to have this at my wedding! Donuts are my weakness. Such a fun wedding touch!

    https://www.kathrineeldridge.com

    Reply
  5. Suzan J says

    May 8, 2020 at 6:02 am

    This is so creative. Such a fun idea!
    http://www.suzanj.com

    Reply
  6. Rach says

    May 8, 2020 at 6:11 am

    Wow it turned out really well!! That’s so sweet of your brother! Now I wish I had a donut wall during my wedding haha!

    http://www.rdsobsessions.com

    Reply
  7. Makeup Muddle says

    May 10, 2020 at 8:28 am

    Wow I can’t believe you guys made that! It looked incredible, and what a gorgeous backdrop for your photos. I would so love a donut wall at my wedding xo

    Makeup Muddle

    Reply
  8. Honeycombee says

    May 11, 2020 at 7:17 pm

    What a creative idea and such a unique backdrop to your photos! And congratulations on the two year engagement anniversary =o)

    http://honeycombee.com/

    Reply

Leave a Reply Cancel reply

Your email address will not be published. Required fields are marked *

I accept the Privacy Policy

This site uses Akismet to reduce spam. Learn how your comment data is processed.

Next Post >

6 Yummy Recipes To Try During Quarantine

Welcome to Just A Tina Bit, a Seattle-based lifestyle blog specifically tailored to millennial working moms. Whether it's being a first time mom, juggling a career in tech, styling and organizing your home, or having fun with DIY projects, I'm here to share all my experiences and hacks so that you can make life just a little bit easier!

Shop My Instagram

Where I Shop for Fashion

Amazon
Asos
Banana Republic
J.Crew
LOFT
Madewell
Nordstrom
Nordstrom Rack
Old Navy
Revolve
Shopbop
Target

Where I Shop for Home Decor

Amazon
Anthropologie
CB2
Crate & Barrel
Etsy
HomeGoods
Marshalls
Minted
Pottery Barn
Pottery Barn Kids
Serena & Lily
Target
Wayfair
West Elm
World Market

Search by Keyword

instagram

Follow @justatinabit

DIY HELLO KITTY PIÑATA TUTORIAL 🐱❤️ This is my thi DIY HELLO KITTY PIÑATA TUTORIAL 🐱❤️ This is my third year making a piñata for big sis’ party so it’s become an annual tradition! Even the kids at the party asked me if there will be a pinata this year lol. We love seeing the kids get better and stronger with their swings as they get older 🥹 

This pinata cost me less than $5 to make but it does take a lot of time and patience. It turned out so cute tho! Comment SHOP and I’ll send links to all of the pinata making supplies + written instructions #pinata #diyparty #hellokittyparty
BÁNH MÌ BAR! 🥖❤️ My mom makes us these simple bánh BÁNH MÌ BAR! 🥖❤️ My mom makes us these simple bánh mìs all the time, so we thought it would be fun to turn it into a mini bánh mì bar for big sis’ birthday party!

My mom made the pâté and pickled carrots + daikon (đồ chua), and for the meat, we just bought Vietnamese ham (chả lụa). We set out all the toppings - cilantro, cucumber, and jalapeno - so everyone could build their own.

These cutie, perfectly sized baguettes are from Q Bakery. My dad went super early to grab them because they sell out fast!

Big sis also requested Panda Express catering since it’s one of her favorites! Comment SHOP for links! #banhmi #foodbar #foodstation
Here is everything we did to prep for big sis’ 6th Here is everything we did to prep for big sis’ 6th Hello Kitty strawberry themed birthday party! 🍓🐱🎀❤️ This one was so fun to put together because I loved Hello Kitty growing up! 

Huge thanks to @ws_kidsparty for the adorable market backdrop, cart, kids chairs, and the fun kids program that everyone loved! ❤️

Comment SHOP for links to everything! #kidspartydecor #partysetup #hellokittyparty
Jeff’s office just got a new upgrade! 🤩 I got him Jeff’s office just got a new upgrade! 🤩 I got him the new @tcl_usa F8D Fire TV cause a guy cant have too many screens 😂 This TV uses QLED technology and has 4K Ultra HD resolution and is available exclusively on Amazon. Comment SHOP for a link to everything! #tclpartner
Did you know you can just…trace onto canvases?! 🎨 Did you know you can just…trace onto canvases?! 🎨 I was soo close to spending $8 per character canvas on Etsy until I learned that I could transfer printed designs onto blank canvases myself!

Between me and Jeff, we traced 30 Hello Kitty canvases in under two hours while watching Married at First Sight Seattle 😂 It was actually kinda fun and saved us $200!

Comment SHOP and I’ll send you the transfer paper and canvases I used + easy DIY instructions ❤️ #canvaspaintings #kidspartyideas #kidscraft
Had to share one last recap of my parents’ 50th we Had to share one last recap of my parents’ 50th wedding anniversary party because that clip of them dancing and my dad dancing with my daughters will forever be one of my favorite memories 🥹

My parents fled Vietnam in 1975 after the war ended. When they arrived in Washington to meet their sponsors, my dad happened to see my mom and aunt at the airport struggling and not knowing any English. He stepped in to help them then pursued my mom for the next six months. They got married shortly after in 1976 and the rest is history!

As recent refugees starting over in a new country, they didn’t have much money, so they had a small, simple wedding. That’s why I knew I wanted to make their 50th anniversary party extra special and give them the beautiful celebration they never had. Happy 50th anniversary to my parents!! ❤️🥂 #50years #anniversaryparty
DIY MARQUEE SIGN! 💡 This is my second time buying DIY MARQUEE SIGN! 💡 This is my second time buying this kit and it’s so easy to make this marquee sign, just snap and hot glue! You can choose any number or letter for your party. This is the 3-foot option. Comment SHOP for the link! #amazonfind #marqueenumbers
AMAZON HOSTING HACK 🤍 To get the draped table look AMAZON HOSTING HACK 🤍 To get the draped table look, use these backdrop curtain drapes! I’ve already washed them and they came out looking clean and new still. Excited to use them for an actual backdrop too. Comment SHOP for the exact link! #hostinghack #tablesettingideas
My favorite part of decorating for a party is putt My favorite part of decorating for a party is putting together the table setting! This one turned out so elegant and timeless 🤩🤍 I’ll share what I used for the draped, pleated look in another video. Comment SHOP for all the links to my parents’ wedding anniversary party decor! #tablesetup #anniversaryparty #tablesettingideas
Party prep for my parents’ 50th wedding anniversar Party prep for my parents’ 50th wedding anniversary! 👰🏻‍♀️🤵🏻‍♂️💍 This was such a big milestone that I wanted to go all out for the party decor 🤍 My parents met shortly after coming to America when the Vietnam War ended and got married within 6 months. 50 years later and here we are 🥹 If you want any decor links, just comment SHOP!  #weddinganniversary

GET TO KNOW ME

About
Contact
FAQ

search

CATEGORIES

Lifestyle
Home Decor
Motherhood
Fashion
  • Copyright Notice
  • Affiliate Disclosure

Copyright © 2026 Just A Tina Bit · Theme by 17th Avenue